 Vacation, all I ever wanted...vacation, have to get away!
I just got home from being in South Florida for the week and I already want to go back! My mom lives in Hollywood, FL and it's always really nice to go down there and see her (and sit on the beach, of course!)
I learned one valuable nail lesson on my way down there last week. I packed a couple bottles of nail polish (color-coordinated with my bikinis, of course) in my carry-on wheeler bag. I thought nothing of it, being that each bottle is way below the 3oz. rule. Of course, they stopped me at security and had me unload my nail polish bottles. They wouldn't let me bring them through because nail polish is flammable. Which I knew, but my brain wasn't screwed in right that day I guess. So I ended up having to pay $25 to check my bag. (It was either that or throw out about $30 worth of nail polish!! THE HORROR!)
 Thats where these Sally Hansen Salon Effects kits come in. Let this be a lesson to you (and me) - if you're going on a short trip where you only need a carry-on, pack one or two of these kits instead of nail polish bottles. You won't have to pay to check a bag, and you'll still be able to enjoy the versatility of changing your mani while you're on vacation!

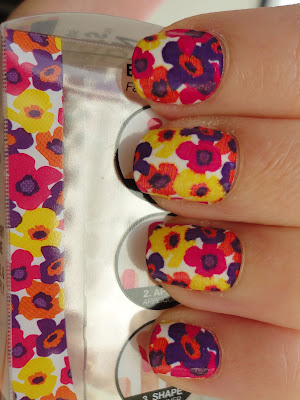
I adore the Sally Hanson Salon Effects nail polish strips. This flowery design, called Spring Fever (pink, yellow, orange, and purple flowers, new for spring 2012), is the third design I've tried from them. They are on the expensive side ($10 per kit for a one-time use), but they are worth it for those times that you need to change your mani but don't have time to wait for it to dry.
I wore this mani the entire time I was in Florida (8 days!) and it held up pretty well. I have some solid tip wear and a tiny chip or two. The reason I love the Salon Effects over other nail stickers I've tried is that they are not actually stickers - they are made with real nail polish, so once they are stuck to your nails, they're really on there! They do not peel off or bubble up. Then just use regular nail polish remover to take them off!

Applying them is pretty easy, and takes about the same amount of time it would for me to paint my nails. You don't use a base or top coat with them. Just make sure your nails are totally clean and dry. Each kit comes with 16 (I think) stickers of various sizes and shapes, so you can pick the ones that fit your nails the best. I included a thumb shot because I have pretty wide thumbnails, and the widest sticker actually covered my whole nail! Just peel the backing off and carefully line it up on your nail, then press it down. Use the enclosed nail file to file off the excess sticker. Then you're done! Easy peasy.
So, fat lot of good it did me to pay that $25 to check my bag. Shoulda just packed this Sally Hansen Salon Effects kit and I would have been good to go! Humph. Lesson learned, folks!


